


Prerequisites
- An active ServiceTitan account with admin access
- Access to ServiceTitan Developer Portal
Setup Steps
Step 1: Register the App in the Developer Portal
- Go to https://developer.servicetitan.io/ and click Sign In & Register Apps.
- Click Sign In as Production Environment User.
- Enter your ServiceTitan user credentials.
- If a Terms of Use page appears, read and click Accept.
- Click Register and Manage Applications.
- Click Register New App.
- When prompted "Who will be accessing the API endpoints/webhooks?", select Our organization.
- Fill in the registration form with the following details:
- Organization: Makini
- Organization/App Website: https://www.makini.io
- Email Address: support@makini.io
- App Name: Makini
- Description: Integration Provider
- App Category: Analytics, Reporting, BI Tool
- Click Add Scopes and select Select All for each of the following categories:
- Accounting (required if you plan to sync invoices)
- CRM
- Dispatch
- Forms
- Job Booking
- Job Planning and Management
- Marketing
- Pricebook (required if you plan to sync invoices)
- Settings
- Timesheets
- The Tenant ID field should be pre-populated with your organization ID.
- Click Register App.
- Once the app is saved, copy the Application Key
❗️Important: Save the Application Key in a secure location. You will need this value to complete the integration.

Step 2: Connect the App to Your ServiceTitan Installation
- Go to https://go.servicetitan.com/ and log in with your credentials.
- Open Settings and navigate to Integrations → API Application Access.
- Click Connect New App.
- Find and select Makini, then click Connect.
- Click Allow Access.
- Read and accept the terms of use.
Step 3: Retrieve Your Client Credentials
- Go back to https://developer.servicetitan.io/ and log in again if your session has expired.
- In the application list, locate Makini and click the App Connections button (the second icon on the right, with a chain link icon).
- A list of connections will open — there should be exactly one entry.

- Copy the Tenant ID and Client ID.

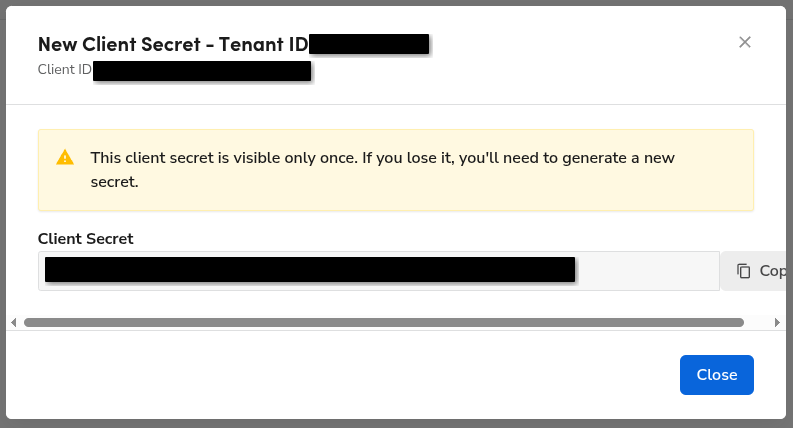
- Under Client Secret, click Generate, then confirm by clicking Yes, continue
- Copy the Client Secret and close the window.
❗️Important: Copy and save the Client Secret immediately. It cannot be viewed again after closing this window.
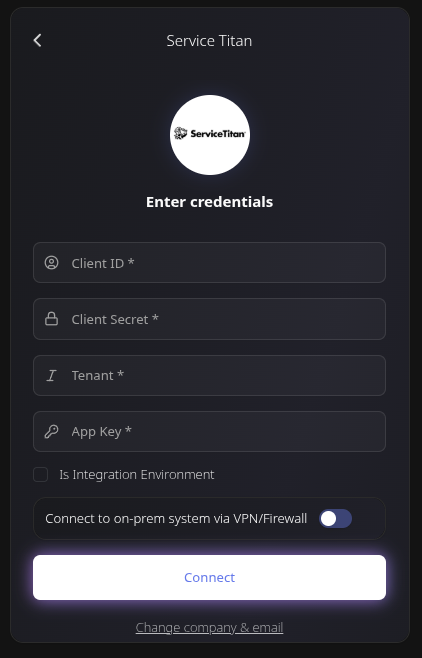
Step 4: Complete Connection in Makini Link
Submit these credentials in Makini Link to finalize your ServiceTitan integration.
In the Makini Link connection interface, provide the following credentials:
- Client ID: From the App Connections page (Step 3)
- Client Secret: Generated on the App Connections page (Step 3)
- Application Key: From the Developer Portal, after registering the app (Step 1)
- Tenant ID: From the App Connections page (Step 3)
If you encounter any issues during this process, contact support@makini.io.
Connection Verification
After completing the setup, Makini Link will attempt to establish a connection with your ServiceTitan account. A successful connection will be indicated in the Makini Link dashboard and you will be issued a respective API token.
Troubleshooting
Common Issues
Connection Failure
- Verify that all four credentials (Client ID, Client Secret, Application Key, Tenant ID) are entered correctly
- Ensure the app is in an Enabled state in the Developer Portal
- Check that the app has been connected and access allowed in ServiceTitan Settings (Step 2)
Permission Errors
- Confirm that all required API scopes were selected during app registration
- Ensure the ServiceTitan user has admin access
Client Secret Issues
- Client secrets can only be viewed once when generated — if lost, generate a new one from the App Connections page
- Make sure you're using the secret for the correct tenant connection
Need Additional Help?
If you continue to experience issues with your ServiceTitan connection, please contact Makini support at support@makini.io


.jpg)


